[Unreal/C++] IK(Inverse Kinematics) Rig사용 역 운동학 구현

언리얼에서 IK를 C++과 2Bone IK를 사용해서 구현했었습니다.
[Unreal/C++] IK(Inverse Kinematics) 역 운동학 구현
[Unreal/C++] IK(Inverse Kinematics) 역 운동학 구현 언리얼 엔진에서 캐릭터가 언덕이나 계단을 오를 때 발이 바닥을 뚫고 들어가는 모습을 많이 볼 수 있습니다. 이는 캐릭터가 발의 위치가 아닌 충돌체
developer-bing-gu.tistory.com
하지만 언리얼 엔진 5에서는 IK를 위한 Rig이 제공됩니다.
언리얼 엔진에서 지원하는 IK Rig을 사용하면 기존의 방법보다 더 자연스러운 표현이 가능합니다.
위치를 보간하는 코드는 기존 게시물과 똑같으니 IK릭을 만들어 사용하는 방법만을 소개합니다.
먼저 IK 릭을 생성해줍니다.

사용할 Skeletal Mesh를 선택합니다.

IK 릭이 생성되면 다음과 같은 창을 볼 수 있습니다.

언리얼 엔진 문서에서 소개하는 화면입니다.
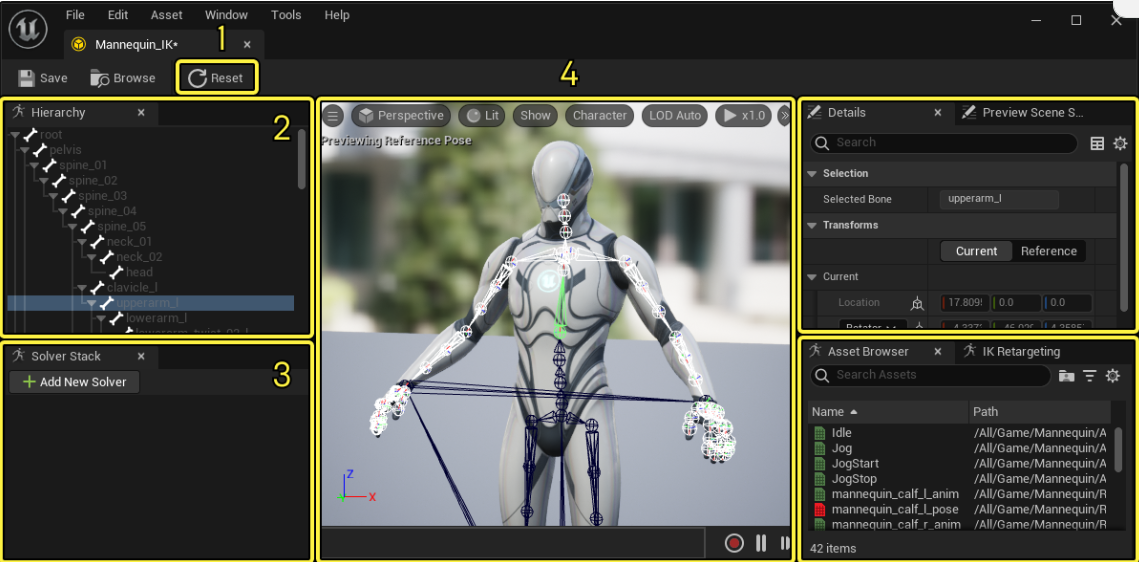
- 리셋(Reset) 버튼은 IK 목표를 디폴트 위치로 리셋합니다.
- 계층구조(Hierarchy) 에는 본, IK 목표, 세팅이 표시됩니다.
- 솔버 스택(Solver Stack) 은 이 스켈레탈 메시에서 사용되는 IK 솔버를 표시합니다.
- 뷰포트(Viewport) 에서는 본을 선택하고 IK 목표를 조작하여 IK 행동의 프리뷰를 볼 수 있습니다.
- 디테일(Details) 패널. 선택한 항목의 프로퍼티를 표시합니다. 프리뷰 씬 세팅(Preview Scene Settings) 에서는 라이팅, 배경 등 주변 뷰포트 환경을 변경할 수 있습니다.
- 에셋 브라우저(Asset Browser) 에는 IK 행동과 함께 프리뷰하여 이펙트를 테스트할 수 있는 애니메이션 시퀀스 목록이 표시됩니다. IK 리타기팅(IK Retargeting) 에서는 IK 릭을 사용하여 캐릭터를 리타기팅하는 경우 IK 리타기터(IK Retargeter) 에셋과 함께 사용할 본 체인을 지정합니다.
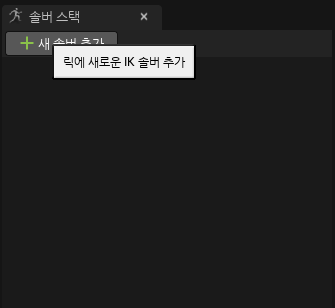
설명은 하단 링크 참조를 걸어놨으니 보도록 하고 솔버스택에서 새 솔버를 추가합니다.
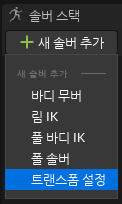

트랜스폼 설정 하나와 림 IK 2개를 생성합니다. 이때 트랜스폼 설정이 가장 위로 오도록 합니다.

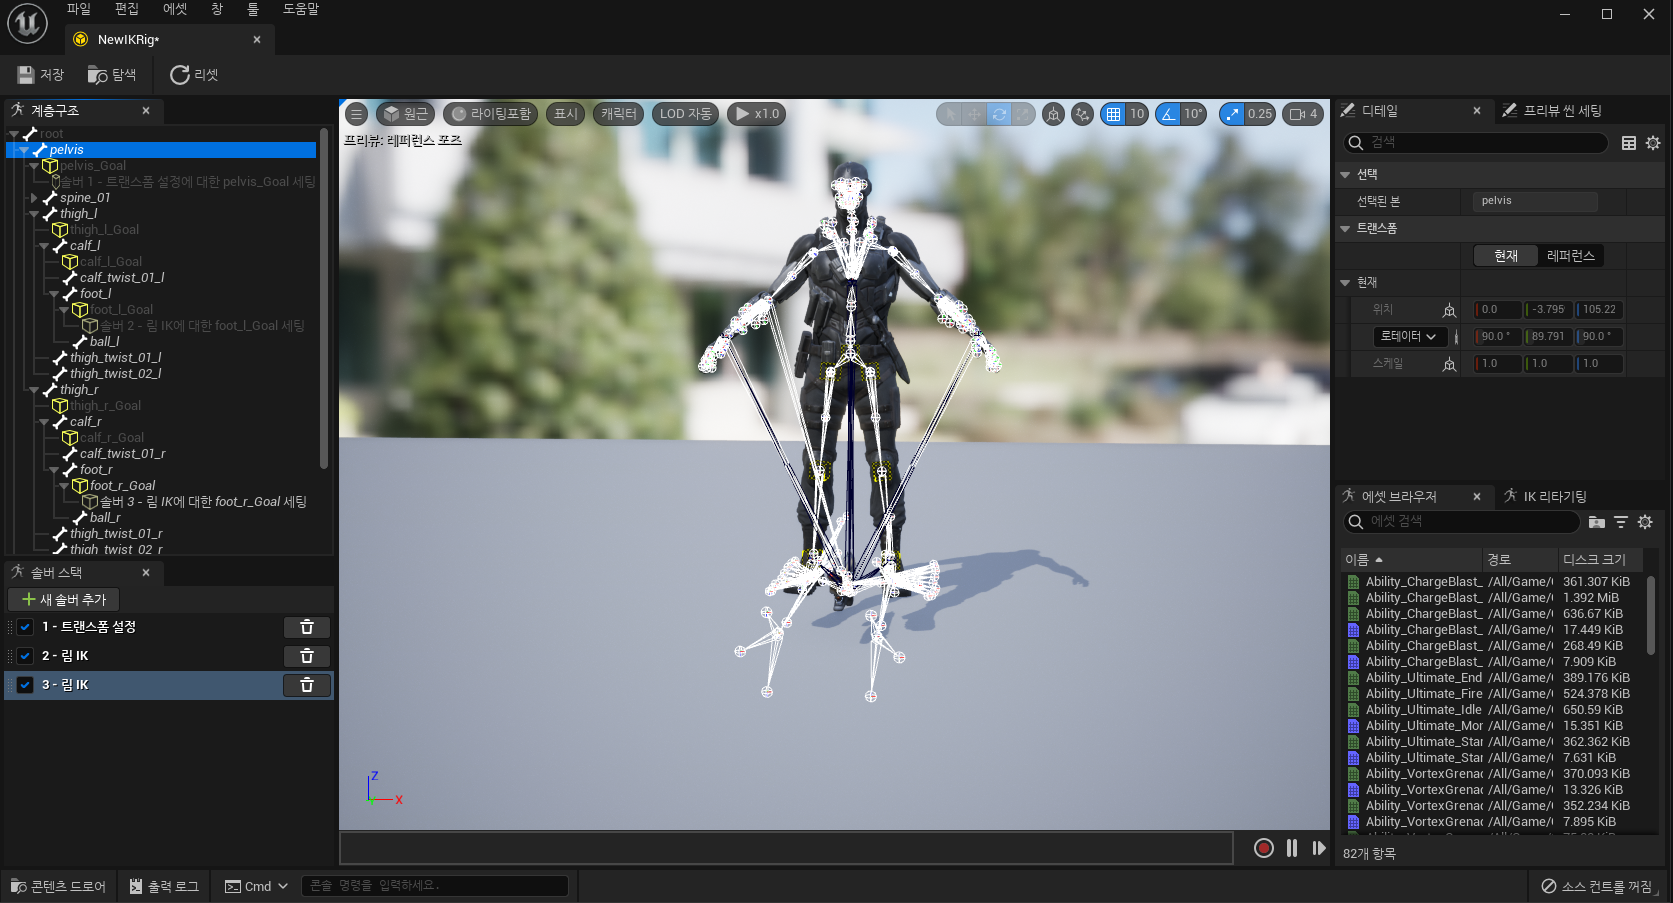
생성이 완료되면 계층 구조에서 필요한 본들을 모두 선택하고 새 IK 목표 설정을 눌러줍니다.
선택할 Bone은 Pelvis, Thigh (L,R), Calf (L,R), Foot (L, R) 입니다.


새 IK 목표 설정이 완료되면 오른쪽 이미지와 같이 사각형 박스가 생성됩니다.


솔버 스택에서 솔버에 목표를 설정해 줍니다. 먼저 트랜스폼 설정 솔버를 클릭한 후 Pelvis_Goal을 우클릭하여 목표를 선택된 솔버에 연결합니다.


이후
2번째 림IK 솔버는 왼쪽 발에 붙어있는 목표를 설정하고
3번째 림IK 솔버는 오른쪽 발에 붙어있는 목표를 설정해줍니다.
설정이 완료되면 목표가 없습니다 라는 안내에서 루트가 없습니다 라고 안내가 변경됩니다.


이제 2번째 3번째 림 IK 솔버를 차례대로 선택 후 선택된 솔버에 루트 본을 설정합니다.
루트본은 자신 상위에 있는 Thigh로 설정합니다. 만약 무릎까지만 필요한 경우 Calf를 루트본으로 설정합니다.

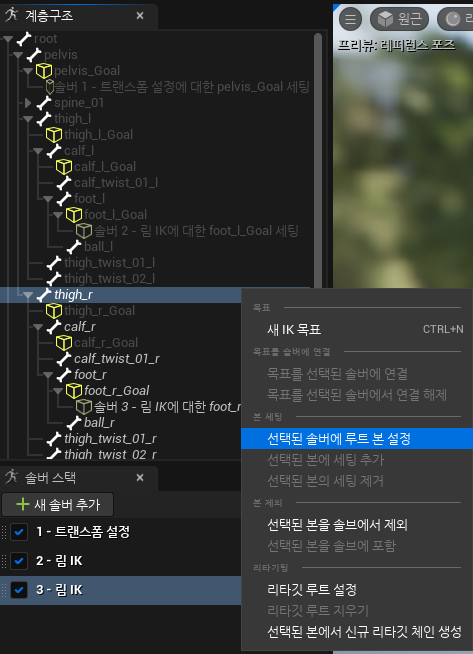
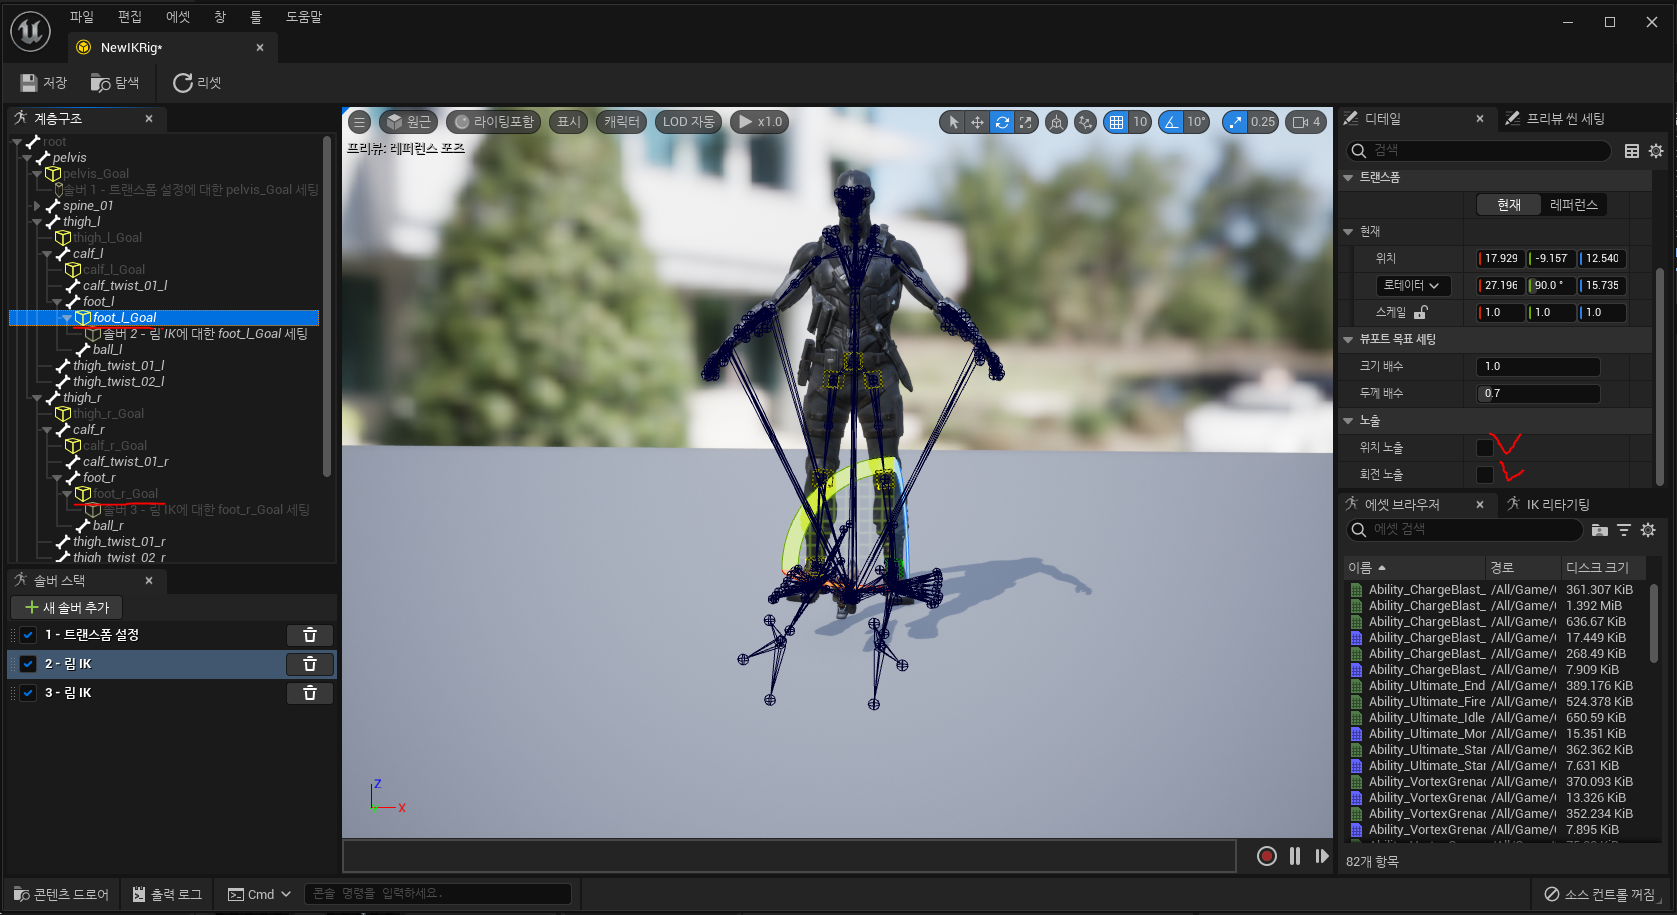
설정이 완료되면 솔버 스택에 안내메시지가 사라지고 연결된 구조가 보입니다.
연결된 구조에서 Foot L과 R 의 목표를 클릭하여 목표를 위아래로 이동시켜봅니다.

무릎까지 들리는 모습을 볼 수 있습니다. 확인이 완료된 경우 리셋버튼을 눌러 제자리로 돌려놓을 수 있습니다.


그 다음에는 Pelvis 목표를 눌러 디테일 패널에서 위치를 노출시키고
Foot L, Foot R 목표를 선택후 위치와 회전을 노출합니다.


IK릭의 설정이 끝났습니다.
애니메이션 블루프린트에서 설정할 차례입니다.
IK 릭을 만들고 릭 정의 에셋을 생성한 릭으로 저장해줍니다.


릭 에셋을 설정 시 위에서 노출한 Pelvis의 위치와 Foot의 위치, 회전 값이 보입니다.


이로써 간단한 설정이 완료되었습니다.

코드는 크게 다르지 않지만 Offset의 설정이 조금 달라졌습니다.
기존 코드는 위 참조 링크에서 확인하고 변경된 TickComponent() 코드를 첨부합니다.
void UInverseKinematicsComponent::TickComponent(float DeltaTime, ELevelTick TickType, FActorComponentTickFunction* ThisTickFunction)
{
	Super::TickComponent(DeltaTime, TickType, ThisTickFunction);

	float leftDistance;
	float rightDistance;
	FRotator leftRotation;
	FRotator rightRotation;
	Trace(LeftSocket, leftDistance, leftRotation);
	Trace(RightSocket, rightDistance, rightRotation);

	float offset = FMath::Min(leftDistance, rightDistance);
	Data.PelvisDistance.Z = UKismetMathLibrary::FInterpTo(Data.PelvisDistance.Z, offset, DeltaTime, InterpSpeed);
	// 이전 버전
	//  Data.LeftDistance.Z = UKismetMathLibrary::FInterpTo(Data.LeftDistance.Z, (leftDistance - offset), DeltaTime, InterpSpeed);
	//  Data.RightDistance.Z = UKismetMathLibrary::FInterpTo(Data.RightDistance.Z, -(rightDistance - offset), DeltaTime, InterpSpeed);
    // 현재 버전
	Data.LeftDistance.Z = UKismetMathLibrary::FInterpTo(Data.LeftDistance.Z, leftDistance, DeltaTime, InterpSpeed);
	Data.RightDistance.Z = UKismetMathLibrary::FInterpTo(Data.RightDistance.Z, rightDistance, DeltaTime, InterpSpeed);

	Data.LeftRotation = UKismetMathLibrary::RInterpTo(Data.LeftRotation, leftRotation, DeltaTime, InterpSpeed);
	Data.RightRotation = UKismetMathLibrary::RInterpTo(Data.RightRotation, rightRotation, DeltaTime, InterpSpeed);
}
#pragma once

#include "CoreMinimal.h"
#include "Components/ActorComponent.h"
#include "Kismet/KismetSystemLibrary.h"
#include "InverseKinematicsComponent.generated.h"

class ACharacter;

USTRUCT(BlueprintType)
struct FIKData
{
	GENERATED_BODY()

public:
	UPROPERTY(BlueprintReadOnly, EditAnywhere)
		FVector LeftDistance;

	UPROPERTY(BlueprintReadOnly, EditAnywhere)
		FVector RightDistance;

	UPROPERTY(BlueprintReadOnly, EditAnywhere)
		FVector PelvisDistance;

	UPROPERTY(BlueprintReadOnly, EditAnywhere)
		FRotator LeftRotation;

	UPROPERTY(BlueprintReadOnly, EditAnywhere)
		FRotator RightRotation;
};

UCLASS(ClassGroup = (Custom), meta = (BlueprintSpawnableComponent))
class MAINPROJECT_API UInverseKinematicsComponent : public UActorComponent
{
	GENERATED_BODY()

public:
	UInverseKinematicsComponent();

protected:
	virtual void BeginPlay() override;

public:
	virtual void TickComponent(float DeltaTime, enum ELevelTick TickType, FActorComponentTickFunction* ThisTickFunction) override;

private :
	void Trace(FName InSocket, float& OutDistance, FRotator& OutRotation);

protected :

	UPROPERTY(BlueprintReadWrite, EditAnywhere, Category = "InverseKinematics")
		TEnumAsByte<EDrawDebugTrace::Type> DrawDebugType = EDrawDebugTrace::None;
	UPROPERTY(BlueprintReadWrite, EditAnywhere, Category = "InverseKinematics")
		FName LeftSocket = "foot_l";
	UPROPERTY(BlueprintReadWrite, EditAnywhere, Category = "InverseKinematics")
		FName RightSocket = "foot_r";
	UPROPERTY(BlueprintReadWrite, EditAnywhere, Category = "InverseKinematics")
		float TraceDistance = 55;
	UPROPERTY(BlueprintReadWrite, EditAnywhere, Category = "InverseKinematics")
		float InterpSpeed = 17;

public :
	FORCEINLINE const FIKData& GetIKData() { return Data; }

private :
	ACharacter* OwnerCharacter;
	FIKData Data;


};
#include "Character/Components/InverseKinematicsComponent.h"

#include "Kismet/KismetMathLibrary.h"
#include "Gameframework/Character.h"
#include "Components/CapsuleComponent.h"

UInverseKinematicsComponent::UInverseKinematicsComponent()
{
	PrimaryComponentTick.bCanEverTick = true;

}

void UInverseKinematicsComponent::BeginPlay()
{
	Super::BeginPlay();

	OwnerCharacter = Cast<ACharacter>(GetOwner());
}

void UInverseKinematicsComponent::TickComponent(float DeltaTime, ELevelTick TickType, FActorComponentTickFunction* ThisTickFunction)
{
	Super::TickComponent(DeltaTime, TickType, ThisTickFunction);

	float leftDistance;
	float rightDistance;
	FRotator leftRotation;
	FRotator rightRotation;
	Trace(LeftSocket, leftDistance, leftRotation);
	Trace(RightSocket, rightDistance, rightRotation);

	float offset = FMath::Min(leftDistance, rightDistance);
	Data.PelvisDistance.Z = UKismetMathLibrary::FInterpTo(Data.PelvisDistance.Z, offset, DeltaTime, InterpSpeed);
	Data.LeftDistance.Z = UKismetMathLibrary::FInterpTo(Data.LeftDistance.Z, leftDistance, DeltaTime, InterpSpeed);
	Data.RightDistance.Z = UKismetMathLibrary::FInterpTo(Data.RightDistance.Z, rightDistance, DeltaTime, InterpSpeed);

	Data.LeftRotation = UKismetMathLibrary::RInterpTo(Data.LeftRotation, leftRotation, DeltaTime, InterpSpeed);
	Data.RightRotation = UKismetMathLibrary::RInterpTo(Data.RightRotation, rightRotation, DeltaTime, InterpSpeed);
}

void UInverseKinematicsComponent::Trace(FName InSocket, float& OutDistance, FRotator& OutRotation)
{
	OutDistance = 0.0f;

	FVector location = OwnerCharacter->GetMesh()->GetSocketLocation(InSocket);
	FVector start = FVector(location.X, location.Y, OwnerCharacter->GetActorLocation().Z);

	float traceZ = start.Z - OwnerCharacter->GetCapsuleComponent()->GetScaledCapsuleHalfHeight() - TraceDistance;
	FVector end = FVector(location.X, location.Y, traceZ);

	TArray<AActor*> ignoreActors;
	ignoreActors.Add(OwnerCharacter);

	FHitResult hitResult;

	UKismetSystemLibrary::LineTraceSingle(GetWorld(), start, end, UEngineTypes::ConvertToTraceType(ECC_Visibility), true, ignoreActors, DrawDebugType, hitResult, true, FLinearColor::Green, FLinearColor::Red);

	if (!hitResult.IsValidBlockingHit()) return;

	float length = (hitResult.ImpactPoint - hitResult.TraceEnd).Size();
	//OutDistance = OffsetDistance + length - TraceDistance;
	OutDistance = length - TraceDistance;

	FVector normal = hitResult.ImpactNormal;
	float roll = UKismetMathLibrary::DegAtan2(normal.X, normal.Z);
	float pitch = -UKismetMathLibrary::DegAtan2(normal.Y, normal.Z);

	OutRotation = FRotator(pitch, 0.0f, roll);
}

IK 릭 에디터
목표, 솔버, 세팅을 사용하여 커스텀 IK 릭을 생성합니다.
docs.unrealengine.com
솔버
솔버를 사용하여 다양한 IK 릭 구성을 생성합니다.
docs.unrealengine.com
IK 릭 리타기팅
IK 릭 및 IK 리타기팅을 사용하여 크기와 무관하게 캐릭터 간 애니메이션을 공유 및 이전합니다.
docs.unrealengine.com
애니메이션 블루프린트의 IK 릭
애니메이션 블루프린트에서 IK 릭을 사용하여 게임플레이 내에서 캐릭터의 프로시저럴 IK 조정을 생성합니다.
docs.unrealengine.com
'Unreal > Manual' 카테고리의 다른 글
| Unreal 언리얼 엔진 멀티플레이어 꿀팁과 요령 (0) | 2024.01.27 |
|---|---|
| Unreal IK릭과 IK리타기터를 이용한 애니메이션 리타겟팅 (0) | 2024.01.27 |
| Unreal IK(Inverse Kinematics) 역 운동학 구현 (0) | 2024.01.15 |
| Unreal 잔상 효과 (Afterimage), GhostTrail 만들기 (0) | 2024.01.15 |
| Unreal 캐릭터 대쉬, 구르기에 사용할 수 있는 LaunchCharacter (0) | 2024.01.14 |


