[Unreal/C++] IK(Inverse Kinematics) 역 운동학 구현
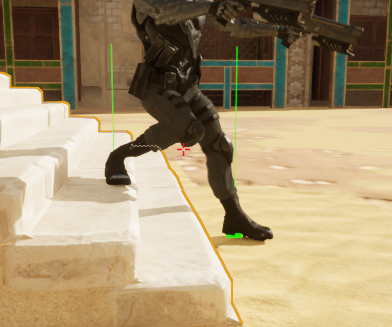
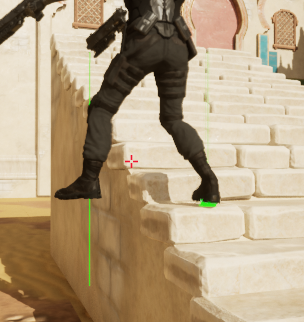
언리얼 엔진에서 캐릭터가 언덕이나 계단을 오를 때 발이 바닥을 뚫고 들어가는 모습을 많이 볼 수 있습니다.
이는 캐릭터가 발의 위치가 아닌 충돌체에 의존하여 서 있기 때문인데 자연스러운 발의 모습을 위해 IK(역 운동학)를 적용시킬 수 있습니다.
언리얼 엔진이나 다른 스켈레톤을 처리하는 툴에서는 정 운동학 (Forward Kinematics)을 사용합니다.
Forward Kinematics (FK:정운동학) : 루트에서부터 애니메이션을 계산하는 방식
아래 이미지처럼 Root 에서부터 Pelvis -> thigh -> calf -> foot 으로 운동을 계산합니다.
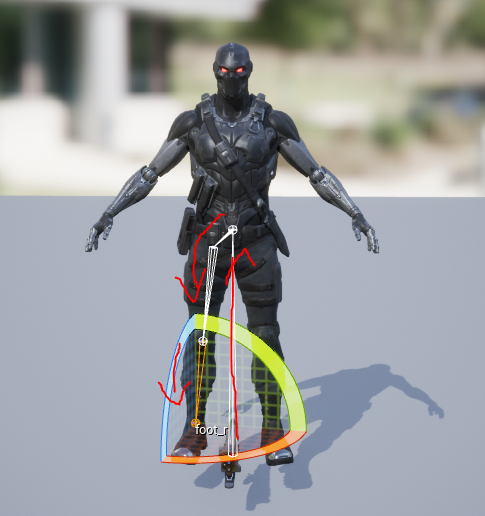

반대로 foot 부터 root 방향으로 계산하는 것을 역 운동학 ( Inverse Kinematics) 이라고 하는데, 계단에서 처럼 발의 높 낮이를 조정하기 위해서는 foot부터 무릎이나 골반까지만 거꾸로 계산할 수 있습니다.
Inverse Kinematics (IK:역운동학) 지정된 본으로부터 반대로 계산하는 방식
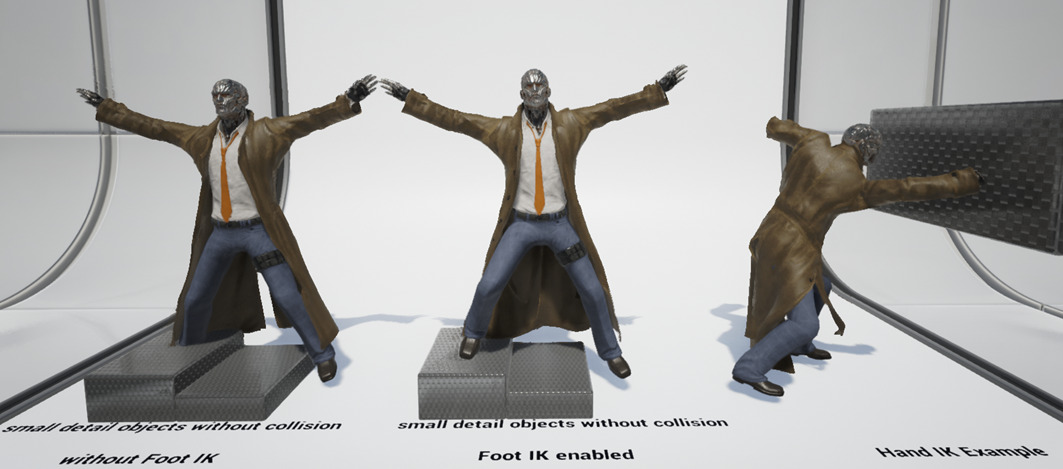
이러한 IK는 로보틱스나 산업 분야에서 많이 활용되는데 이를 활용하여 높이가 다른 물체 위에 서있는 캐릭터를 자연스럽게 만들 수 있습니다. 물론 발의 위치 뿐만 아니라 벽을 뚫고 지나가는 손을 막는 등 여러가지 일을 수행할 수 있습니다.
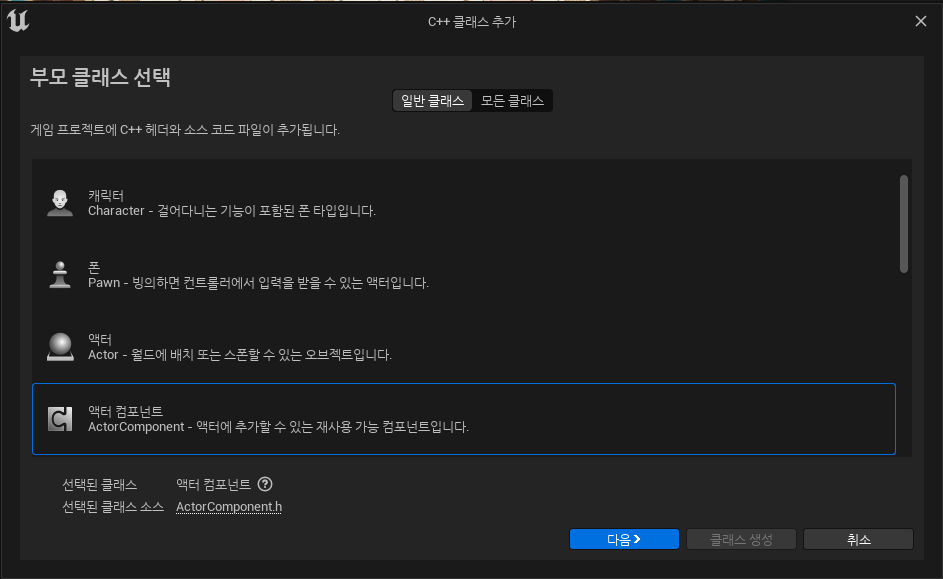
구현
Actor Component를 상속받는 클래스 IKComponent를 생성합니다.
UCLASS 위에 구조체를 선언합니다.
LeftDistance와 RightDistance는 바닥 높이와 얼만큼 차이가 나는지를 구하고 PelvisDistance는 허리도 같이 내려와야 다른 발이 땅에 닿기 때문에 같이 움직여줘야 합니다.
USTRUCT(BlueprintType)
struct FIKData
{
	GENERATED_BODY()

	// float형으로 사용해도 되지만 블프에서 작업하기가 귀찮음
public:
	UPROPERTY(BlueprintReadOnly, EditAnywhere)
		FVector LeftDistance;	// X축만 사용

	UPROPERTY(BlueprintReadOnly, EditAnywhere)
		FVector RightDistance;	// X축만 사용

	UPROPERTY(BlueprintReadOnly, EditAnywhere)
		FVector PelvisDistance;	// Z축만 사용
};
LeftDistance와 RightDistance는 왼발과 오른발의 높이를 구하기 위해 사용하는데 X축만 사용하는 이유는 스켈레톤에서 발의 로컬 공간 회전 값 중 위아래를 향하는 축이 X축이기 때문입니다. 또한 Pelvis는 Z축만 사용하는데 이는 Root역할을 하기 때문에 월드 공간으로 계산되어야 하기 때문입니다.
구조체가 정의 되었으면 클래스도 함께 선언합니다.
UCLASS(ClassGroup = (Custom), meta = (BlueprintSpawnableComponent))
class MAINPROJECT_API UInverseKinematicsComponent : public UActorComponent
{
GENERATED_BODY()
public:
UInverseKinematicsComponent();
protected:
virtual void BeginPlay() override;
public:
virtual void TickComponent(float DeltaTime, enum ELevelTick TickType, FActorComponentTickFunction* ThisTickFunction) override;
private :
// 본이나 소켓을 가져오고 지면에 붙을 간격을 구하는 함수
void Trace(FName InSocket, float& OutDistance);
protected :
// LineTraceSingle을 사용하기 위함
UPROPERTY(BlueprintReadWrite, EditAnywhere, Category = "InverseKinematics")
TEnumAsByte<EDrawDebugTrace::Type> DrawDebugType = EDrawDebugTrace::None;
// 왼발, 오른발 소켓 이름
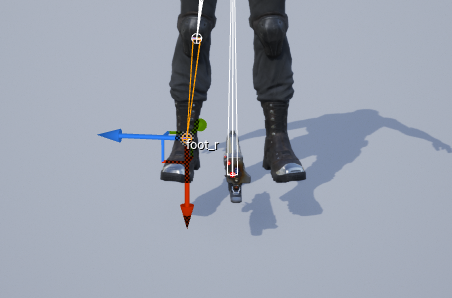
UPROPERTY(BlueprintReadWrite, EditAnywhere, Category = "InverseKinematics")
FName LeftSocket = "foot_l";
UPROPERTY(BlueprintReadWrite, EditAnywhere, Category = "InverseKinematics")
FName RightSocket = "foot_r";
// 너무 크면 점프할때도 지면에 착 붙는 느낌 ;;
UPROPERTY(BlueprintReadWrite, EditAnywhere, Category = "InverseKinematics")
float TraceDistance = 55;
// 보정 스피드
UPROPERTY(BlueprintReadWrite, EditAnywhere, Category = "InverseKinematics")
float InterpSpeed = 17;
// 보정 값
UPROPERTY(BlueprintReadWrite, EditAnywhere, Category = "InverseKinematics")
float OffsetDistance = 5;
public :
FORCEINLINE const FIKData& GetIKData() { return Data; }
private :
ACharacter* OwnerCharacter;
FIKData Data;
};
먼저 OffsetDistance는 바닥에서 떠 있는 발의 오차를 줄이기 위해 사용합니다. 없어도 크게 상관은 없습니다.
소켓의 이름은 본 이름이어도 상관 없습니다. 캐릭터 스켈레톤에 ik 지점이 제작되어 있다면 ik를 사용하는 것이 좋습니다.
파라곤 에셋에서는 저의 구현 중 잘 못 된 부분이 있어서 ik릭을 사용했을 경우 동작하지 않았습니다.
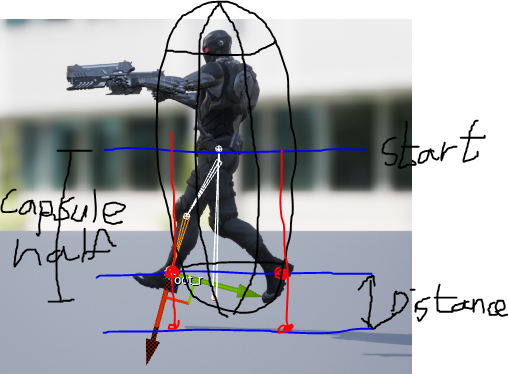
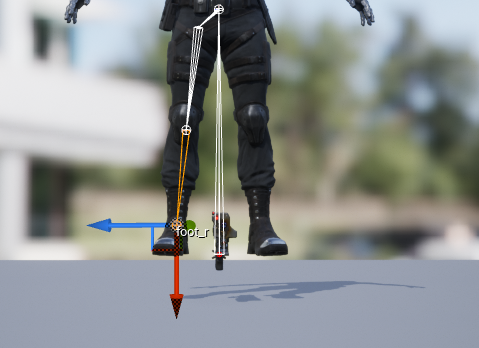
어쨌든 지면과 발의 높낮이를 맞추기 위해 Capsule의 Half 높이 (캐릭터의 중간지점)을 start로 두고 발을 가로지르는 직선이 땅과 충돌하게끔 제작할 것입니다. 한 쪽 발이 계단 위에 올라가있을 경우 계단 아래까지 충돌을 확인하기 위해 TraceDistance 변수를 두었습니다.
위 설명을 토대로 스크립트를 작성합니다.
#include "Character/Components/InverseKinematicsComponent.h"

#include "Kismet/KismetMathLibrary.h"
#include "Gameframework/Character.h"
#include "Components/CapsuleComponent.h"

UInverseKinematicsComponent::UInverseKinematicsComponent()
{
	PrimaryComponentTick.bCanEverTick = true;

}

void UInverseKinematicsComponent::BeginPlay()
{
	Super::BeginPlay();

	OwnerCharacter = Cast<ACharacter>(GetOwner());
}

void UInverseKinematicsComponent::TickComponent(float DeltaTime, ELevelTick TickType, FActorComponentTickFunction* ThisTickFunction)
{
	Super::TickComponent(DeltaTime, TickType, ThisTickFunction);

	// Tick에서 간격을 구함
	float leftDistance;
	float rightDistance;
	Trace(LeftSocket, leftDistance);
	Trace(RightSocket, rightDistance);

	float offset = FMath::Min(leftDistance, rightDistance);
	Data.PelvisDistance.Z = UKismetMathLibrary::FInterpTo(Data.PelvisDistance.Z, offset, DeltaTime, InterpSpeed);
	Data.LeftDistance.X = UKismetMathLibrary::FInterpTo(Data.LeftDistance.X, (leftDistance - offset), DeltaTime, InterpSpeed);
	Data.RightDistance.X = UKismetMathLibrary::FInterpTo(Data.RightDistance.X, -(rightDistance - offset), DeltaTime, InterpSpeed);
}

void UInverseKinematicsComponent::Trace(FName InSocket, float& OutDistance)
{
	OutDistance = 0.0f;

	FVector location = OwnerCharacter->GetMesh()->GetSocketLocation(InSocket);	// 소켓의 위치 정보를 가져옵니다.
    // 캡슐의 반 크기 + 계단 높이 정도의 Ray를 쏘기 위한 추적 높이를 구합니다.
	float traceZ = start.Z - OwnerCharacter->GetCapsuleComponent()->GetScaledCapsuleHalfHeight() - TraceDistance;

    FVector start = FVector(location.X, location.Y, OwnerCharacter->GetActorLocation().Z);	// 시작점은 액터의 허리 높이입니다.
	FVector end = FVector(location.X, location.Y, traceZ);	// 끝 지점은 계단 높이를 추가한 더 아래 높이

	TArray<AActor*> ignoreActors;
	ignoreActors.Add(OwnerCharacter);	// 캐릭터를 충돌에서 제외합니다.

	FHitResult hitResult;	// LineTrace에서 result를 받기 위한 변수를 준비합니다.

	UKismetSystemLibrary::LineTraceSingle(GetWorld(), start, end, UEngineTypes::ConvertToTraceType(ECC_Visibility), true, ignoreActors, DrawDebugType, hitResult, true, FLinearColor::Green, FLinearColor::Red);

	if (!hitResult.IsValidBlockingHit()) return;	// LineTrace에서 체크된 대상이 없습니다.

	float length = (hitResult.ImpactPoint - hitResult.TraceEnd).Size();	// 충돌 지점의 높이를 구하고
	OutDistance = OffsetDistance + length - TraceDistance;	// 계산된 결과를 저장합니다.
}
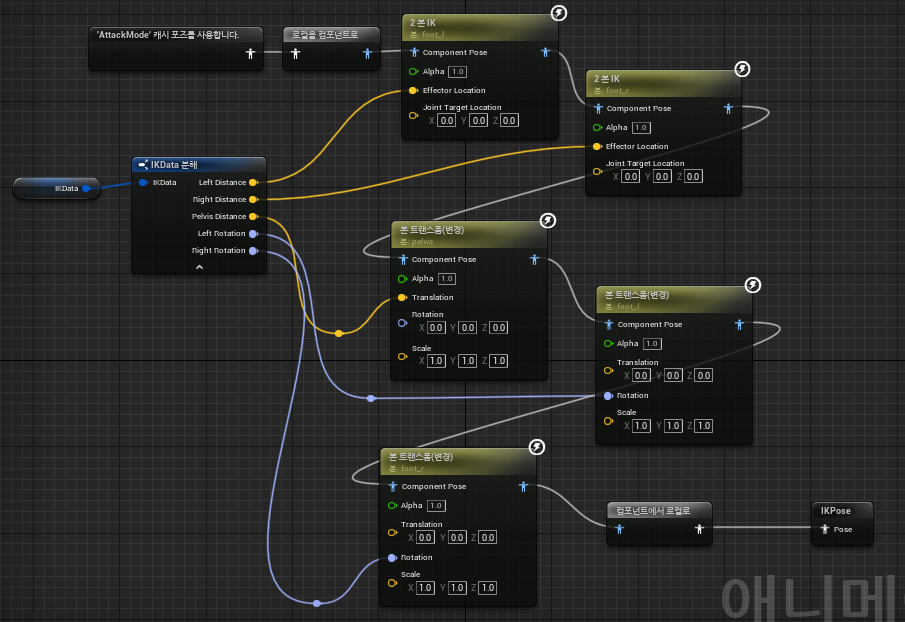
코드 작성이 완료되면 컴파일을 하고 Animation Blueprint에서 그래프를 조작합니다.
AttackMode 캐시포즈는 무시하고 자신의 최종 Animation 결과를 사용합니다.
IKData는 이후 경사면에서 발목을 회전시키기 위해 Rotation이 추가되어 있습니다. Rotation은 현재 무시합니다.
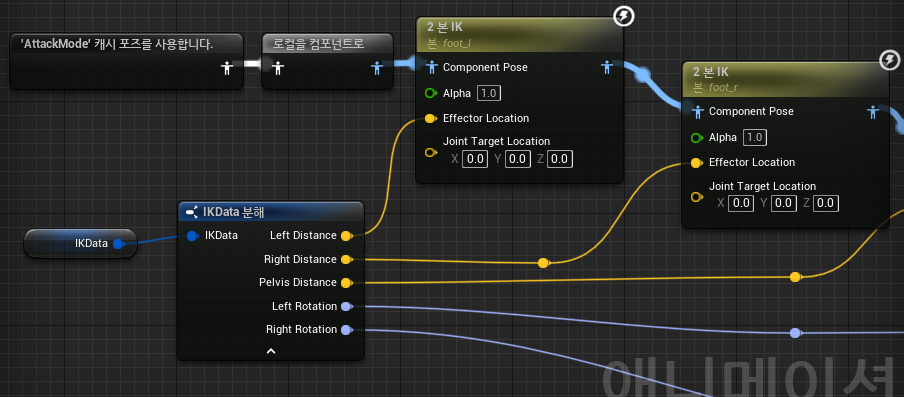
IK는 컴포넌트 공간에서 적용되기 때문에 최종 Animation Pose에서 로컬을 컴포넌트로 변경해줍니다.
변경한 컴포넌트는 2본 IK 노드를 사용하여 적용시켜줍니다.
2본 IK의 설정은 다음과 같이 수정합니다.
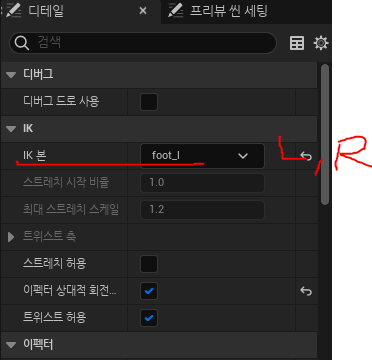
IK
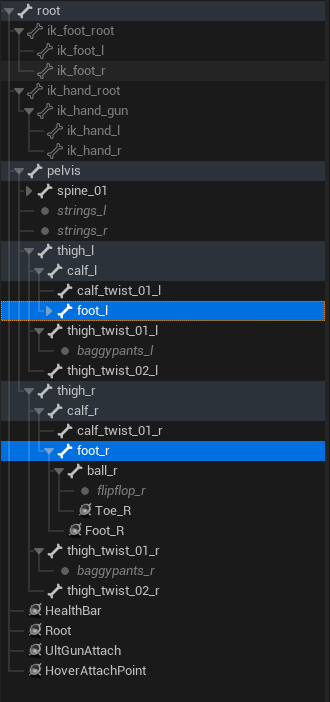
IK 본을 foot_l과 foot_r로 설정합니다.
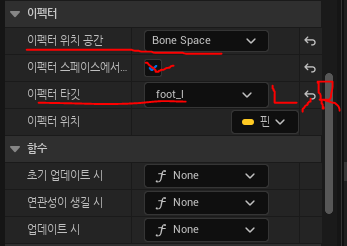
Effector
이펙터의 위치 공간을 BoneSpace로 설정합니다.
이펙터 스페이스에서 회전 가져오기를 체크합니다.
이펙터 타깃을 foot_l과 foot_r로 설정합니다. (실제로 움직일 Bone)
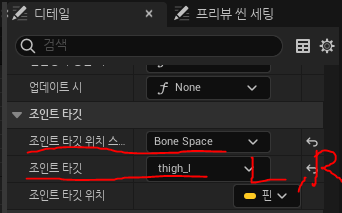
Joint
조인트 타깃 위치 공간을 BoneSpace로 설정합니다.
조인트 타깃을 무릎(calf_l, r)이나 골반(thigh_l, r)으로 설정합니다.
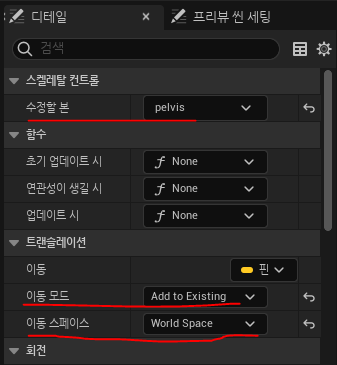
이후 본 트랜스폼(변경)으로 허리(Pelvis)위치도 조정해줍니다.
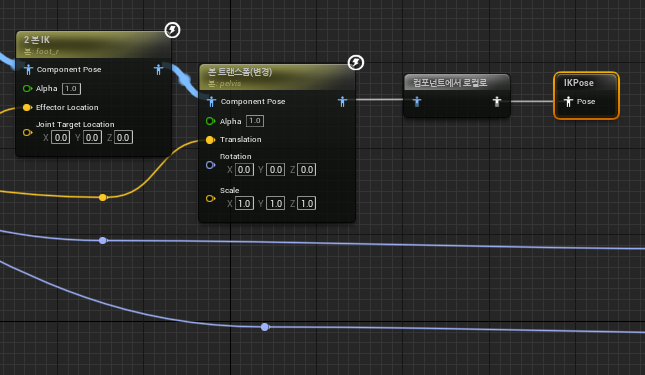
Pelvis는 root역할을 하기 때문에 BonsSpace가 아닌 WorldSpace로 지정됩니다.
여기까지 완료되었으면 준비는 거의 끝났습니다.
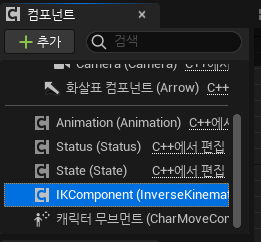
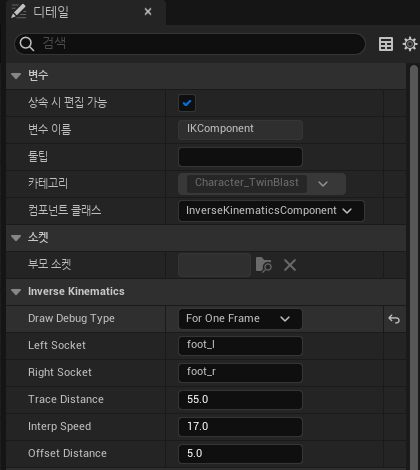
마지막으로 자신의 캐릭터에서 IKComponent를 추가하고 DebugDraw옵션을 켜주면 됩니다.
// MyCharacter.h
UPROPERTY(VisibleDefaultsOnly)
class UInverseKinematicsComponent* IKComponent;
// MyCharacter.cpp 생성자 안에서
IKComponent = CreateDefaultSubobject<UInverseKinematicsComponent>(TEXT("InverseKinematics"));
자신의 캐릭터에서 코드를 추가했다면 컴파일을 한 후 BP 캐릭터로 컴포넌트가 잘 추가되었는지 확인합니다.
그리고 IKComponent에서 DrawDebugType을 For One Frame으로 변경 후 DebugLine이 잘 그려지는지 확인합니다.
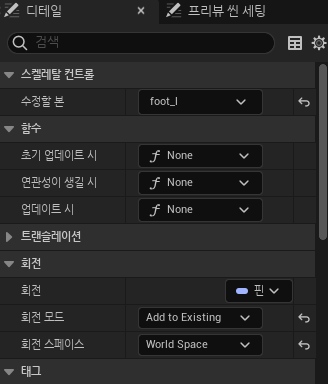
이후 경사면에서 발목을 회전시키는 것은 다음과 같습니다.
// 구조체에 두 변수를 추가합니다.
UPROPERTY(BlueprintReadOnly, EditAnywhere)
FRotator LeftRotation;
UPROPERTY(BlueprintReadOnly, EditAnywhere)
FRotator RightRotation;
// Trace함수의 선언을 수정합니다. Rotation이 추가되었습니다.
void Trace(FName InSocket, float& OutDistance, FRotator& OutRotation);
// TickComponent() 에서 Trace를 호출하는 부분에 FRotator를 추가합니다.
float leftDistance;
float rightDistance;
FRotator leftRotation; // 추가
FRotator rightRotation; // 추가
Trace(LeftSocket, leftDistance, leftRotation); // 변경
Trace(RightSocket, rightDistance, rightRotation); // 변경
// TickComponent() 제일 하단에 추가
Data.LeftRotation = UKismetMathLibrary::RInterpTo(Data.LeftRotation, leftRotation, DeltaTime, InterpSpeed); Data.RightRotation = UKismetMathLibrary::RInterpTo(Data.RightRotation, rightRotation, DeltaTime, InterpSpeed);
// Trace 함수에 추가
FVector normal = hitResult.ImpactNormal;
float roll = UKismetMathLibrary::DegAtan2(normal.Y, normal.Z);
float pitch = -UKismetMathLibrary::DegAtan2(normal.X, normal.Z);
OutRotation = FRotator(pitch, 0.0f, roll);
경사면 발의 회전을 추가한 그래프 모습

글 하단에 전체 코드가 포함되어 있습니다.
추가 정보
- IK는 컴포넌트 공간에서 수행된다.
- 컴포넌트공간은 소켓이 포함되어있는 SkeletalMeshComponent의 공간이다.
- 발이 회전할 수 있도록 작업할 예정이라면 Take Rotation Form Effector에 체크를 한다.
- IK본이 따로 있다면 IKBone은 설정된 IK를 지정하고 EffectorTarget은 실제 Bone을 연결한다.
- 캐릭터의 좌우는 항상 대칭이므로 값을 계산할 때도 대칭으로 계산한다. (왼발 오른발 값을 구할 때 - 조심)
- Bone의 위치를 보면 right Foot의 거리는 -값이기 때문에 +로 계산해야한다.
- 다리만 계산하면 어색하다. 허리도 내려와야 어색하지 않은 IK가 완성된다.
- Pelvis(허리)는 Z값만 사용한다.
- 스켈레톤을 확인했을 때 Root와 같이 Pelvis는 월드 공간 상의 회전 방향을 사용해야 한다.
* Root는 언리얼 내부적으로 캐릭터의 위치를 움직이기 위한 가상 Bone이기 때문에
본의 시작은 Pelvis이다. 따라서 본의 시작 공간은 항상 월드 공간이라 볼 수 있다.
* Pelvis를 제외한 Bone들은 로컬 공간이다.
IKComponent 전체 코드
// IKComponent.h
#pragma once

#include "CoreMinimal.h"
#include "Components/ActorComponent.h"
#include "Kismet/KismetSystemLibrary.h"
#include "InverseKinematicsComponent.generated.h"

class ACharacter;

USTRUCT(BlueprintType)
struct FIKData
{
	GENERATED_BODY()

public:
	UPROPERTY(BlueprintReadOnly, EditAnywhere)
		FVector LeftDistance;	// X축만 사용

	UPROPERTY(BlueprintReadOnly, EditAnywhere)
		FVector RightDistance;	// X축만 사용

	UPROPERTY(BlueprintReadOnly, EditAnywhere)
		FVector PelvisDistance;	// Z축만 사용

	UPROPERTY(BlueprintReadOnly, EditAnywhere)
		FRotator LeftRotation;

	UPROPERTY(BlueprintReadOnly, EditAnywhere)
		FRotator RightRotation;
};

UCLASS(ClassGroup = (Custom), meta = (BlueprintSpawnableComponent))
class MAINPROJECT_API UInverseKinematicsComponent : public UActorComponent
{
	GENERATED_BODY()

public:
	UInverseKinematicsComponent();

protected:
	virtual void BeginPlay() override;

public:
	virtual void TickComponent(float DeltaTime, enum ELevelTick TickType, FActorComponentTickFunction* ThisTickFunction) override;

private :
	void Trace(FName InSocket, float& OutDistance, FRotator& OutRotation);

protected :

	UPROPERTY(BlueprintReadWrite, EditAnywhere, Category = "InverseKinematics")
		TEnumAsByte<EDrawDebugTrace::Type> DrawDebugType = EDrawDebugTrace::None;
	UPROPERTY(BlueprintReadWrite, EditAnywhere, Category = "InverseKinematics")
		FName LeftSocket = "foot_l";
	UPROPERTY(BlueprintReadWrite, EditAnywhere, Category = "InverseKinematics")
		FName RightSocket = "foot_r";
	UPROPERTY(BlueprintReadWrite, EditAnywhere, Category = "InverseKinematics")
		float TraceDistance = 55;
	UPROPERTY(BlueprintReadWrite, EditAnywhere, Category = "InverseKinematics")
		float InterpSpeed = 17;
	UPROPERTY(BlueprintReadWrite, EditAnywhere, Category = "InverseKinematics")
		float OffsetDistance = 5;

public :
	FORCEINLINE const FIKData& GetIKData() { return Data; }

private :
	ACharacter* OwnerCharacter;
	FIKData Data;


};
// IKComponent.cpp

#include "Character/Components/InverseKinematicsComponent.h"

#include "Kismet/KismetMathLibrary.h"
#include "Gameframework/Character.h"
#include "Components/CapsuleComponent.h"

UInverseKinematicsComponent::UInverseKinematicsComponent()
{
	PrimaryComponentTick.bCanEverTick = true;

}

void UInverseKinematicsComponent::BeginPlay()
{
	Super::BeginPlay();

	OwnerCharacter = Cast<ACharacter>(GetOwner());
}

void UInverseKinematicsComponent::TickComponent(float DeltaTime, ELevelTick TickType, FActorComponentTickFunction* ThisTickFunction)
{
	Super::TickComponent(DeltaTime, TickType, ThisTickFunction);

	float leftDistance;
	FRotator leftRotation;
	Trace(LeftSocket, leftDistance, leftRotation);
	float rightDistance;
	FRotator rightRotation;
	Trace(RightSocket, rightDistance, rightRotation);

	float offset = FMath::Min(leftDistance, rightDistance);
	Data.PelvisDistance.Z = UKismetMathLibrary::FInterpTo(Data.PelvisDistance.Z, offset, DeltaTime, InterpSpeed);

	Data.LeftDistance.X = UKismetMathLibrary::FInterpTo(Data.LeftDistance.X, (leftDistance - offset), DeltaTime, InterpSpeed);
	Data.RightDistance.X = UKismetMathLibrary::FInterpTo(Data.RightDistance.X, -(rightDistance - offset), DeltaTime, InterpSpeed);
	Data.LeftRotation = UKismetMathLibrary::RInterpTo(Data.LeftRotation, leftRotation, DeltaTime, InterpSpeed);
	Data.RightRotation = UKismetMathLibrary::RInterpTo(Data.RightRotation, rightRotation, DeltaTime, InterpSpeed);
}

void UInverseKinematicsComponent::Trace(FName InSocket, float& OutDistance, FRotator& OutRotation)
{
	OutDistance = 0.0f;

	FVector location = OwnerCharacter->GetMesh()->GetSocketLocation(InSocket);
	FVector start = FVector(location.X, location.Y, OwnerCharacter->GetActorLocation().Z);

	float traceZ = start.Z - OwnerCharacter->GetCapsuleComponent()->GetScaledCapsuleHalfHeight() - TraceDistance;
	FVector end = FVector(location.X, location.Y, traceZ);

	TArray<AActor*> ignoreActors;
	ignoreActors.Add(OwnerCharacter);

	FHitResult hitResult;

	UKismetSystemLibrary::LineTraceSingle(GetWorld(), start, end, UEngineTypes::ConvertToTraceType(ECC_Visibility), true, ignoreActors, DrawDebugType, hitResult, true, FLinearColor::Green, FLinearColor::Red);

	float length = (hitResult.ImpactPoint - hitResult.TraceEnd).Size();
	OutDistance = OffsetDistance + length - TraceDistance;

	FVector normal = hitResult.ImpactNormal;
	float roll = UKismetMathLibrary::DegAtan2(normal.Y, normal.Z);
	float pitch = -UKismetMathLibrary::DegAtan2(normal.X, normal.Z);

	OutRotation = FRotator(pitch, 0.0f, roll);
}
IK 셋업
Inverse Kinematic 시스템으로 고르지 않은 지형에서의 발딛기같은 반응형 애니메이션이 가능합니다.
docs.unrealengine.com
IK 릭
IK 릭 및 리타기팅 툴을 사용하여 애니메이션을 리타기팅하고 프로시저럴하게 조정합니다.
docs.unrealengine.com
IK 릭 에디터
목표, 솔버, 세팅을 사용하여 커스텀 IK 릭을 생성합니다.
docs.unrealengine.com
'Unreal > Manual' 카테고리의 다른 글
| Unreal IK릭과 IK리타기터를 이용한 애니메이션 리타겟팅 (0) | 2024.01.27 |
|---|---|
| Unreal IK(Inverse Kinematics) Rig사용 역 운동학 구현 (0) | 2024.01.15 |
| Unreal 잔상 효과 (Afterimage), GhostTrail 만들기 (0) | 2024.01.15 |
| Unreal 캐릭터 대쉬, 구르기에 사용할 수 있는 LaunchCharacter (0) | 2024.01.14 |
| Unreal 플레이어를 바라보는 방향으로 적 회전 (0) | 2024.01.14 |


